DMARC

Dealing with DMARC

If you have never heard of DMARC (Domain-based Message Authentication, Reporting and Conformance) then you are not alone.

Normally this is something that only email providers have to deal with.

This changed in 2014 when several large email providers (most notable: AOL and Yahoo) made a policy change at their email servers. This was done in order to fight SPAM mails.

Unfortunately this had a negative side effect on us mailing list operators.

Not only WP Mailster, but every mailing list software is affected.

A simplified explanation of the DMARC policy change is given below. If you are interested in the bits and pieces we recommend to read this email from the IETF mailing list or Yahoo’s reasons given in an article.

The DMARC Issue

The issue is about where (from which email provider) an email is coming from, not to which email provider it will be sent to by WP Mailster.

Yahoo/AOL/others are essentially instructing any receiving domain (= the mail providers of your mailing list recipients) to reject mail that purports to originate from Yahoo/AOL/… domain, but that comes from someone else. They recognize this when the email structure gets altered (e.g. the sender address or the subject gets changed).

However that is exactly what mailing lists are there for: it takes an email coming from one email provider, processes it (where various modifications are done, e.g. footers are added) and forwards it to all mailing list members.

Hence mailing list emails are rejected which produces a bounce.

WP Mailster’s DMARC Workaround

The way we deal with DMARC is definitely a workaround, however it is the best we can do for now.

Beginning with WP Mailster version 1.7, the following settings were introduced for the general settings:

With this functionality WP Mailster will look at where the emails sent to the list are coming from and decides between “normal” email providers and the “DMARC relevant” ones. Nothing will change for the first group.

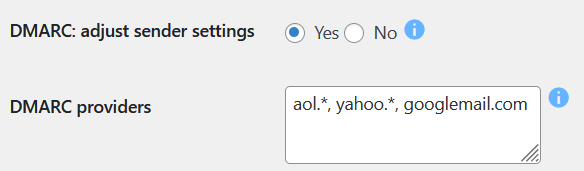
For the second group, WP Mailster will take ownership of the emails. That means it will replace the FROM email address (e.g. john.doe@yahoo.com) with the mailing list address (discussion@example.com).

By default this is done for AOL and Yahoo email addresses, but there is a setting where more email providers can be added if needed (see image above).

How To Deal With Send Errors

What are send errors?

The send errors are messages your email server is giving back to WP Mailster basically saying “I will not forward this message”. There are different reasons that emails get rejected from being sent.

An example is that too many emails were sent (per hour / day) so that the email quota of your hoster has been exceeded. Another example is that the hoster does not except emails with a certain content.

What does happen when send errors occur?

WP Mailster retries to send the email several times. If the send errors occur again, it will eventually stop sending.

The way this shows is the status in the email archive: a send error is indicated in the respective column:

In the above example you see that there is no check in the “Sent” column. That means the send error made WP Mailster stop sending this particular email. The remaining recipients (email instances) will be kept in the email queue.

What are my options with the current email?

You can try to continue the send process (in the hope that no new send error occur). To do so, open up the email in the email archive and click the button “Reset send errors, continue sending“.

Alternatively, you can skip the remaining recipients and remove them from the queue via the button “Remove remaining queue entries“.

How can I determine the exact cause for the send error?

You can dig deeper by opening the email in the email archive and open the “Send report” tab. Scroll down and see if you can locate the server error.

If that is not showing or only a generic message is recorded, you can enable the debug logging mode and try to reproduce the problem with the extended logging enabled. That usually results in more information being available in the send report.

Restoring Site Access / Error 500 / Blank Screen Issues

White Screen of Death? What is this error 500?

A 500 error is an internal server error. It usually means that there’s an error in the software running on the server or misconfiguration of the server.
The message “internal server error” is very generic and thus does not indicate which exact problem occurred. There are often situations where you only see a “white screen of death” that does not give you any hint what is going wrong.

How can I find out the root cause?

Depending on your webhoster there are different options available.

PHP Error Log

Many hosters provide the option to access PHP’s error log through their web interface (e.g. cPanel). Look for entries like “Fatal Error”.

Show Error in Browser

By default WordPress suppresses all errors and warnings. We can tell WordPress to show the problem by editing the wp-config.php file.
Note: this means changing PHP code. Be very careful when doing so as you might introduce errors here.

Set the WP_DEBUG value on like this:

define( 'WP_DEBUG', true );

That should print the error on the screen. More likely, it will also show non-critical notices and warnings. Since it may reveal a lot of interna about your site it is not always good to show the errors on a public live site.
But you can do something about that by setting two further configuration settings to:

define( 'WP_DEBUG_DISPLAY', false );
define( 'WP_DEBUG_LOG', true );

This will prevent the errors being shown on the screen and will tell WordPress to write the error to a log file in your content directory.

What should I do when this error is coming from WP Mailster?
What if you cannot login to the site?

Stop the Plugin via FTP

In case WP Mailster is the plugin making trouble: don’t worry, there is a way to login to the site by telling the WP Mailster plugin to stop it’s execution.

Create a text file called “no_mst_plg_exec.txt” or “no_mst_plg_exec” and upload it via FTP to the WordPress uploads directory (a subfolder of the WordPress content directory). It is not important what is in the file (it can be empty), but the filename has to be exactly one of the both mentioned variants.

After creating the file you should be able to login to access your site’s backend, again.

Then disable all your mailing lists.

If you already know that this problem is due to a very large email sitting in the inbox (PHP out of memory error): directly navigate to your mailing list’s settings, in the “Tools” section and use the link to delete the first email from the inbox. After fixing the error do not forget to reactivate the mail plugin.

If the error is caused by something else do reach out to our support.

What if I cannot access FTP, how can I disable the email forwarder plugin?

If you cannot access the site via FTP you need to go directly into the database (e.g. using phpMyAdmin) and deactivate the mailing lists there.

This can be done by opening the [prefix]_mailster_lists table. For all entries set the value of the “active” field from 1 to 0.

How To Create a Log File

Debug Log File

Our support might require you to send the log file of WP Mailster. Usually Mailster only logs basic/sparse information. For troubleshooting needs we therefore require more information. This is what we call we Debug Log File.

This is how this information can be generated:

  • go to WP Mailster > “Settings” > increase “Logging Level” to “Max. Logging (Debug)”

  • do the steps to reproduce the problem/error you want us to look at (e.g. send a test message that will reproduce the problem to your mailing list address)
  • only after you have reproduced the error (that might mean to wait 5 – 10 minutes until a mailing list message was retrieved and forwarded) put the “Logging Level” setting back to the former value
  • open the file space of your WordPress installation (e.g. via FTP) and navigate to:
    /wp-content/uploads/wp-mailster/
  • send us the file “wpmst.log.php” (as a .zip archive if possible)

Log File Size

Please note that the “Maximum (Debug)” logging level produces a lot of information, therefore the log file gets big fairly quickly. Thus it is recommended to immediately switch it back to the “Normal” logging mode when you have followed the steps above.

When the troubleshooting process is completed you can simply delete the log file.


Add to cart