
The settings are organized in the following tabs:
- General settings
- Mailbox settings
- Sender settings
- Mail content
- List behaviour
- Moderation
- Sending behaviour
- Subscribing
- Archiving
- Notifications
- Tools
General settings
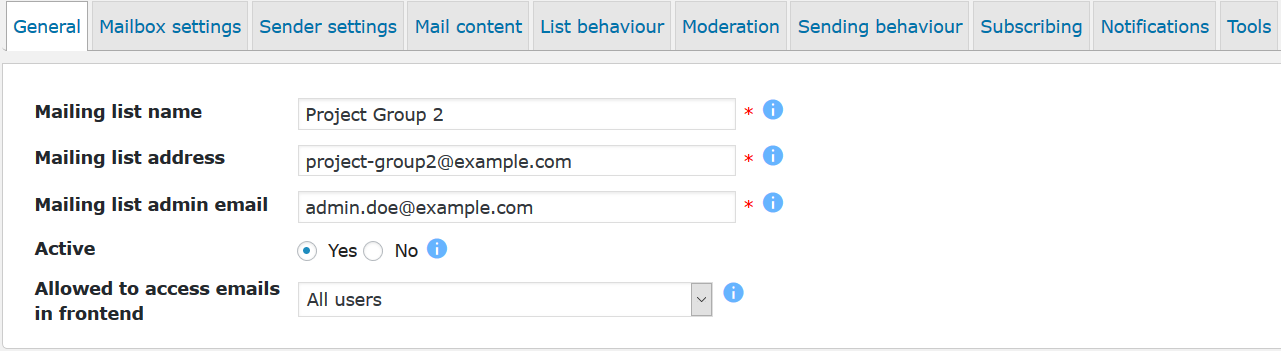
- Mailing list name: Choose a name for your mailing list
- Mailing list email: Enter the email the mailing list members will send their mails to
- Mailing admin email: The administrator will get notifies when something goes wrong, must not be the list’s email and must be a valid email address
- Active: Make sure the list is active (this enables mail retrieving and forwarding)
- Allow to access emails in frontend: You can publish the archive of emails on your site or hide them
Mailbox settings
WP Mailster uses a normal email mailbox that can be accessed with IMAP or POP3.
You can either choose one of the readily available settings or, what we recommend in most cases, use your own email provider (e.g. of the domain hosting you are using).
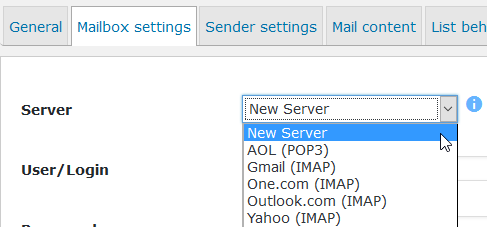
Adding a new Mailbox Server
Choose “New Server” in the Server dropdown menu.
You will see input fields to enter the server login information.
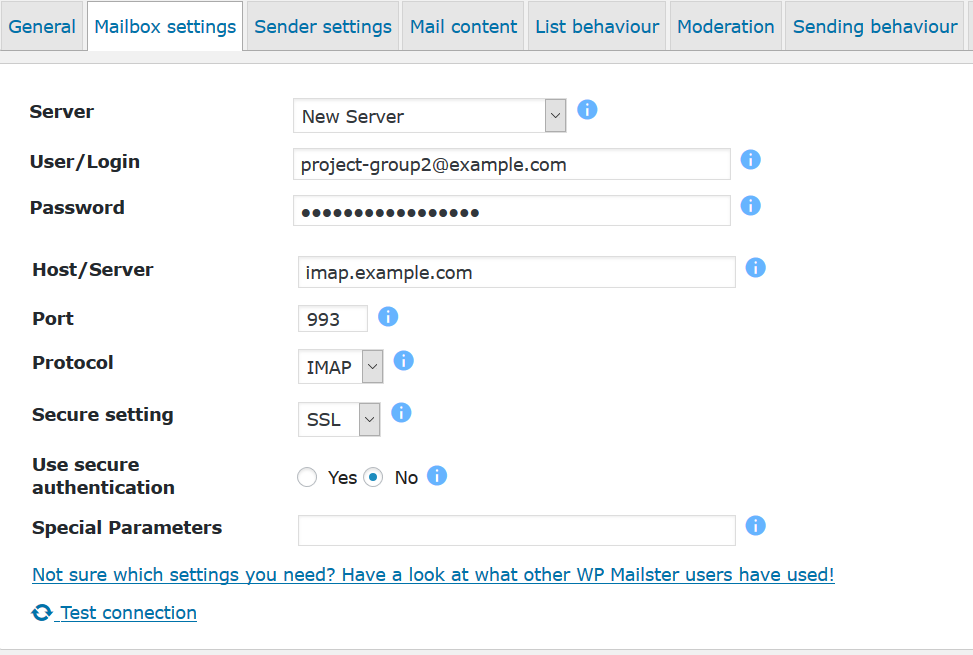
The settings in this section are crucial for a working mailing list. Ask your mail provider (of the mailing list email you provided in the last section) for the needed details or have a look at the settings of popular providers.
- User/Login: The login user, normally the email address or the part of the email address before the @ letter
- Password: The user’s password
- Host/Server: The address of the mail-server
- Port: The port number of the mail server
- Protocol: The protocol to use at this server/port
- Secure setting: You can enable a secured connection when the server supports this feature
- Use secure authentication: Some servers require a secure authentication
- Special parameters: Not always needed. A common “special” parameter is /novalidate-cert which disables the verification of the email server’s certificate. This is needed for self-signed certificates.
You can click on ‘Test connection‘ to make sure your settings are correct.
Please use a dedicated mailbox for WP Mailster. Any emails in it will be treated as mailing list emails and therefore send out to the recipients. Thus, do not use your personal email accounts, create/use a different email account.
Sender settings
You have two choices here: the easy way is to use your normal mailbox sender (the one WordPress uses).
The other way (which is recommended) is only a little more difficult: using an SMTP server.
You can either choose one of the readily available settings or, what we recommend in most cases, use your own email provider (e.g. of the domain hosting you are using).
Adding a new SMTP Server
First, choose “New Server” in the Server dropdown menu.

- User/Login: The login user, normally the email address or the part of the email address before the @ letter
- Password: The user’s password
- Host/Server: The address of the mail server
- Port: The port number of the mail server
- Secure setting: You can enable a secured connection when the server supports this feature
- Use secure authentication: Some servers support a secure authentication
You can click on ‘Test connection‘ to make sure your settings are correct.
Mail content
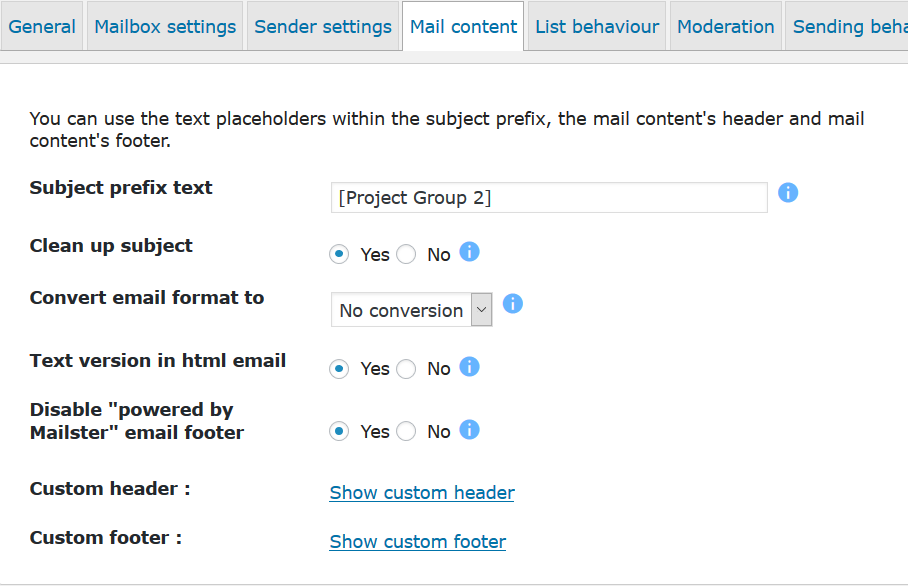
- Subject Prefix Text: Text to insert before the subject
- Clean up subject: If active the subject of replies will be normalized so that no “Re: Re:” chains occur
- Convert email format to: The emails sent to the mailing list can be converted to a unified format
- Text version in HTML emails: When the format of the emails is HTML it is a good idea to include a text format version
- Custom header: Text to insert before the body: one field for HTML emails and one for text emails. You can use text variables here (see below).
- Custom footer: Text to insert after the body: one field for HTML emails and one for text emails. You can use text variables here (see below).
- Disable “powered by WP Mailster” mail footer: The footer can be disabled in the pro-editions
You can add custom elements to the mails posted to the mailing list.
Besides of normal text you can use text variables to insert texts dynamical. These are the available variables:
- {email} Sender’s email
- {name} Sender’s name
- {description} Senders’ description (if found in WP Mailster’s user data)
- {date} Email send date/time
- {orig_to} Original TO recipients
- {orig_cc} Original CC recipients
- {list} List’s name
- {post_email} List’s email address
- {admin_email} List administrator’s email address
- {site} WordPress site name
- {unsubscribe} Link to the unsubscribe page
- {recip_email} Recipient’s email (not working with BCC/CC addressing*)
- {recip_name} Recipient’s name (not working with BCC/CC addressing*)
Only then the personalization can be done.
The variables can be used in the subject, the custom headers and custom footers.
If you want to create nice unsubscribe links use the {unsubscribe} variable as the link location: 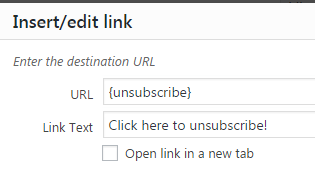
List behaviour
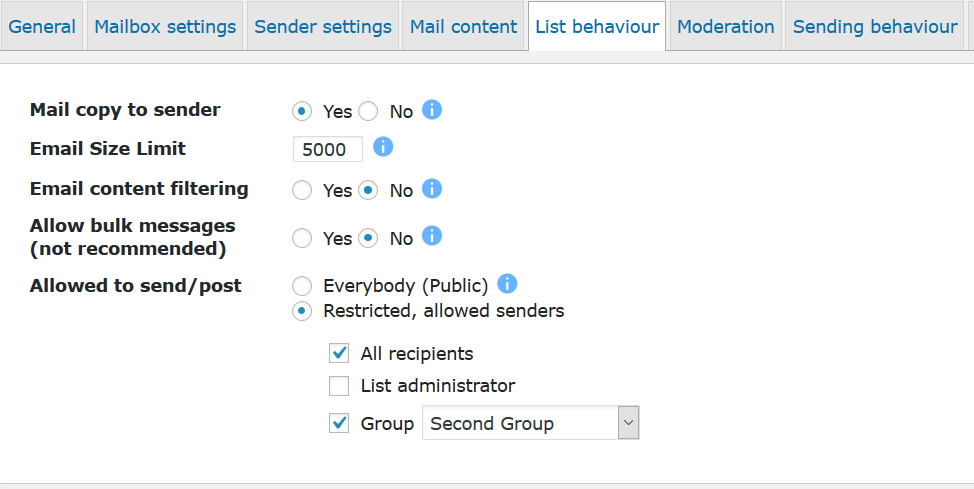 The settings in this tab largely determine how the list works and how it can be used.
- Mail copy to sender: Copy of the sent mail to the sender On/Off
- Email size limit: You can specify the maximum email size (in kByte) for the mailing list emails. If the email size is bigger the emails are not forwarded to the recipients. Zero means that there is no limit.
- Email content filtering: If activated emails are not forwarded that contain certain disallowed keywords. This words are configured in WP Mailster’s configuration. (pro-editions only)
- Allowed to send/post: Decide whether your mailing list should be public (also non-subscribers can post) or that you want to restrict the valid senders (based on their email addresses). Emails of unauthorized senders are blocked and not forwarded.
Moderation
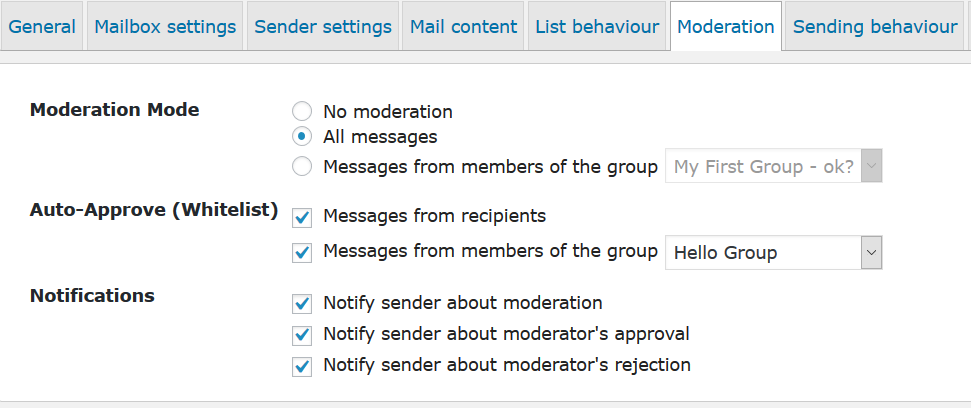 Use the moderation functionality (Society & Enterprise edition only) to guard your lists against inappropriate content such as spam, off-topic discussions or unwanted solicitations.
The list administrator gets informed about a new message to be moderated. Approval or rejections can either be done via links in the emails sent to the moderator or in the WP Mailster email archive in the WP admin area.
- Moderation Mode: Switch the moderation on/off. You can either moderate all messages or only of a specific user group.
- Auto-Approve (Whitelist) Maybe you trust some senders more than others: with the auto-approval you can avoid that every message needs to approved.
- Notifications You can decide to keep the sender of the moderated email informed about the process by turning on notifications about the moderation and the moderator’s decision (approval/rejection).
Sending behaviour
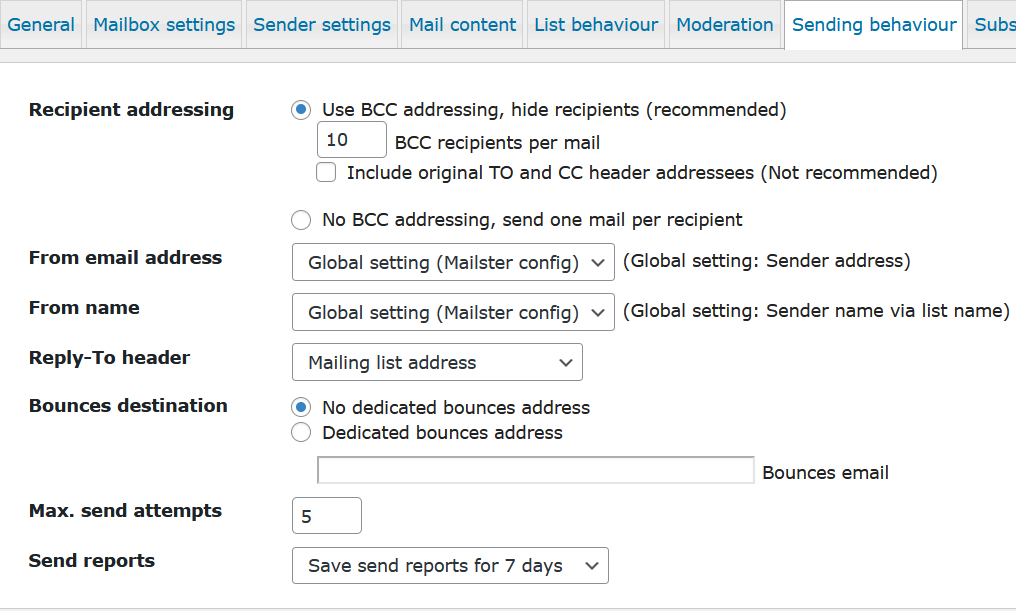
- Recipient addressing: In general it is recommended to use the BCC recipient addressing in order to send mails to large recipient groups efficiently.
If activated one “physical” mail is used to send it to as much recipients as defined in BCC recipients per mail. Otherwise each recipient gets a “physical” mail.
It is common that you have to use SMTP sending and not the PHP mail function in order to use BCC addressing. If your WordPress system does not use SMTP for outgoing mails you probably need to configure WP Mailster to use a SMTP server for sending.
Some mail providers and ISPs have restrictions regarding the number of BCC recipients and some do not allow mails that have no recipients in the TO-address-field. - From email address: Choose whether the mailing list’s email address or the sender’s email address is used as the from address of the sent emails.
Note 1: some mail servers do not accept an overwrite of the from address
Note 2: due to the DMARC problematic, this setting maybe adjusted for some emails on the fly - From name: Same option as From email address, only applies to the name of the sender
- Reply-To header: Determine the target address for replies to the mailing list emails. Note: it is a good idea to try out the different options to see which settings fits your purposes best.
- Bounces destination: Bounced emails are automatic replies to mailing list emails such as Out-of-Office emails and Delivery-Status-Notificatons (e.g. Notification regarding a failed delivery).
Bounced emails are in general not intended to go to the mailing list subscribers. Therefore WP Mailster drops them when they return to the mailbox. This consumes, especially on larger lists, quite some computational efforts. In order to avoid this you can provide an email address where the bounces should go. Note: some email servers allow to overwrite this setting, some don’t. - Send limit: Maximum number of emails to send per hour. 0 and empty field means unthrottled/unlimited sending. (pro-editions only)
- Max. send attempts: When errors occur during the send process it is later retried to send the mail
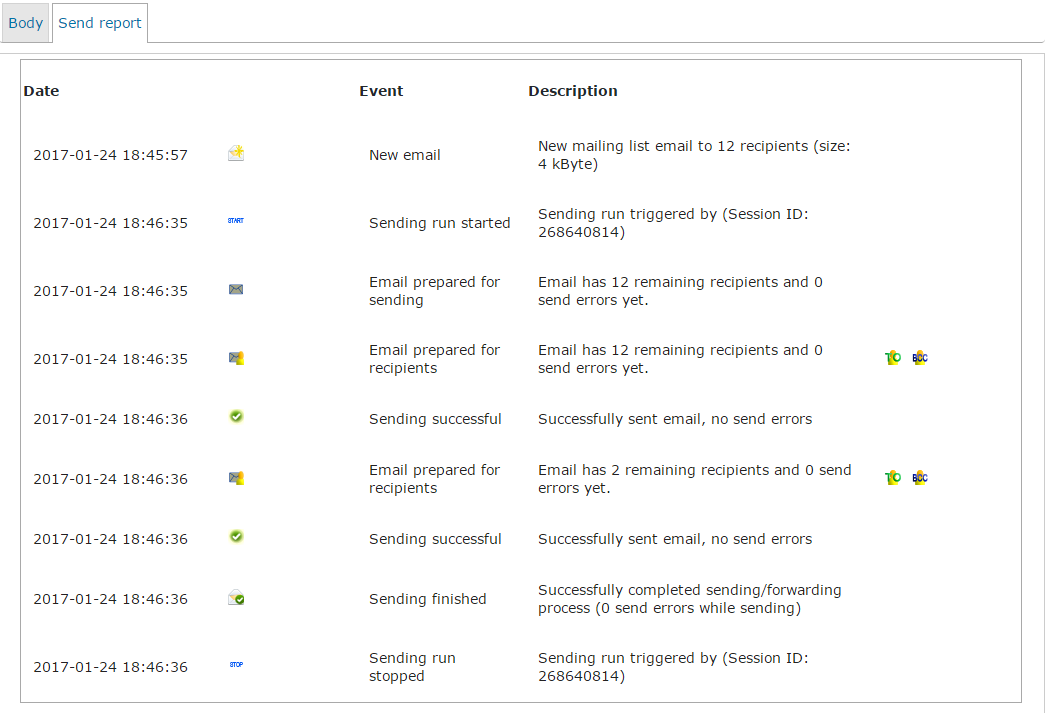
- Send reports: For verification/debugging the email sending process can be recorded. The send reports, when existing for an email, can be viewed in the email archive in the entry of the respective email:
Subscribing
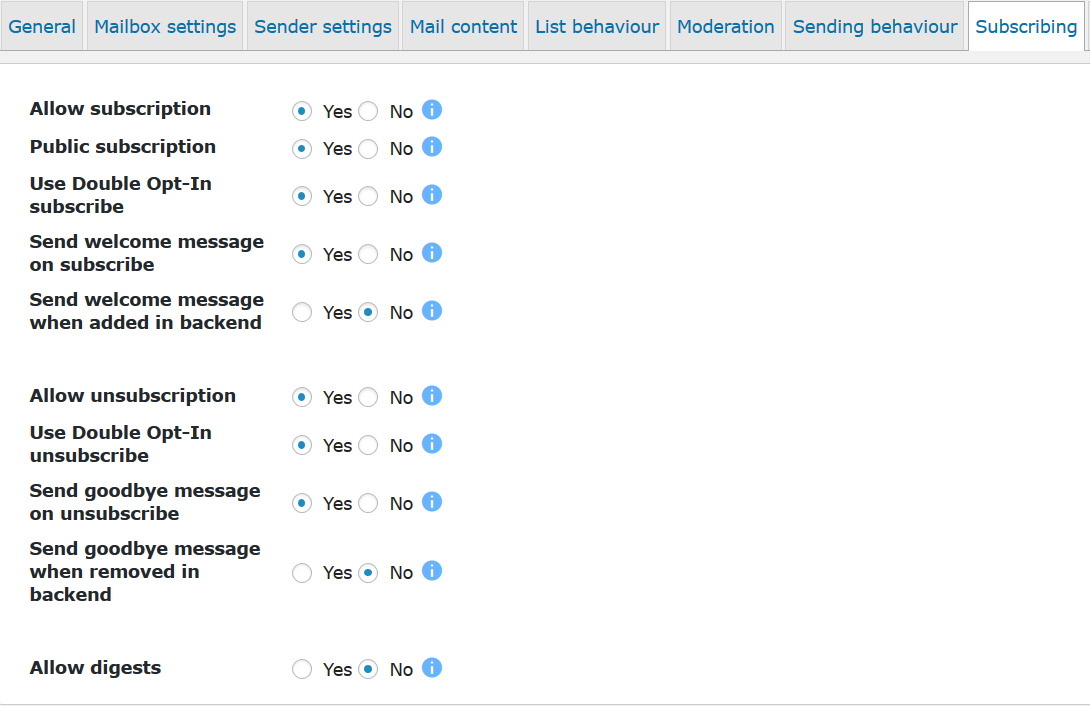
- Allow subscription: Subscribing through subscriber plugin/module on/off. When set to No/off users can only be added to the mailing list in the backend.
- Public subscription: Allow subscribing when user is not logged-in on/off. When set to No/off only registered, logged-in users are able to subscribe to the mailing list.
- Use Double Opt-In subscribe: The Double Opt-In method requires the subscriber to confirm his subscription (by clicking a link in an email) before the subscription process is complete. (pro-editions only)
- Send welcome message on subscribe: When a person subscribes to a mailing list an automated welcome message can be sent out.
- Send welcome message when added in backend: When an admin adds a person to a mailing list in the backend an automated welcome message can be sent out.
- Allow unsubscription: Unsubscribing through subscriber plugin/module on/off. When set to No/off users can only be removed from the mailing list in the backend.
- Use Double Opt-In unsubscribe: The Double Opt-In method requires the subscriber to confirm his unsubscription (by clicking a link in an email) before the unsubscription process is complete. (pro-editions only)
- Send goodbye message on subscribe: When a person unsubscribes from a mailing list an automated goodbye message can be sent out.
- Send goodbye message when removed in backend: When an admin removes a person from a mailing list an automated goodbye message can be sent out.
- Allow digest: Subscribers are allowed to choose whether they want to receive the mailing messages in (daily/weekly/monthly) digests. (Society and Enterprise editions only)
Archiving
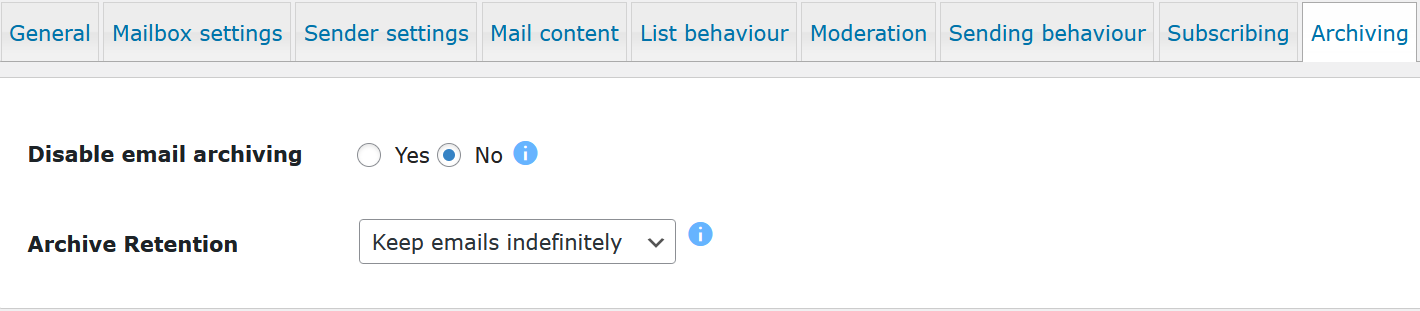
- Disable email archiving: You can disable the archiving of the mailing list emails (pro-editions only)
- Archive Retention: Per default, emails are kept indefinitely in the archive. You can also choose to auto-delete the emails (incl. attachment files) after a defined amount of days.(pro-editions only)
Notifications
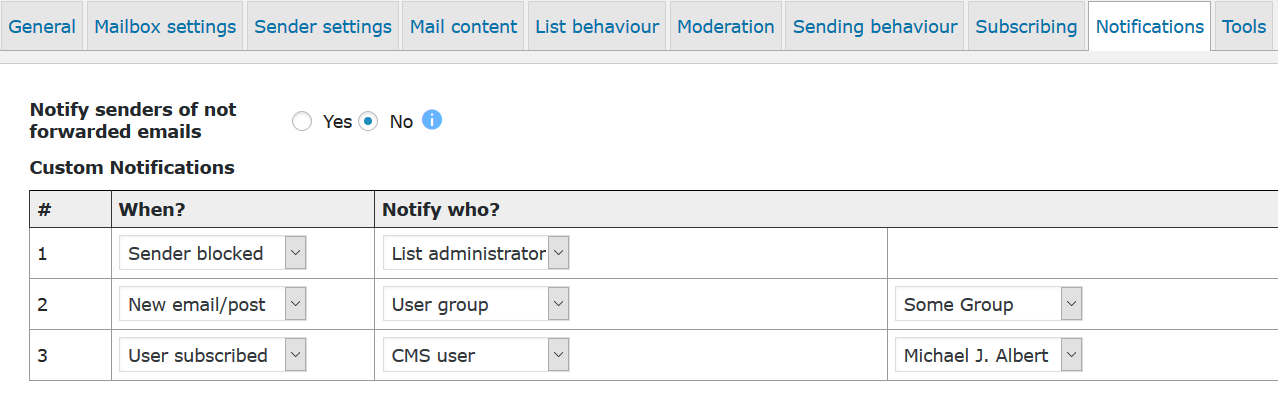
- Notify senders of not forwarded emails: If an email is not forwarded (e.g. because the email address is not allowed to send or the email is filtered because of its content) the sender can be notified.
- Custom notifications (pro-editions only): You can create custom email notifications for the following events:
- New email/post
- Sender blocked
- Bounced email
- Filtered email
- User subscribed
- User unsubscribed
- Send error
One of the following recipient (groups) can be notified:
- WordPress user – one certain user
- List administrator – the mailing list’s administrator
- User group – one WP Mailster user group
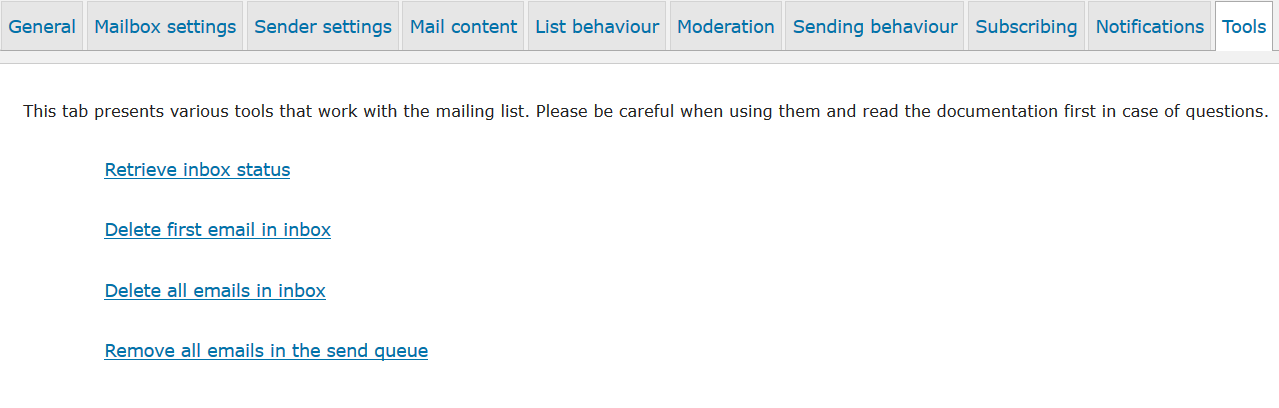 The tools section offers some specific functionality that you probably will not need every day. It is recommended to only use it when you know exactly what it does or if the support tells you to do so.